ESPRESSIF ESP8266
Introduction
The ESP8266 chip from Espressif is the new generation of low-cost WiFi chips after the TI CC3000/CC3200. This small chip not only integrates the whole WiFi features, but also a powerful programmable MCU. Depending on the board layout (ESP-01, ESP-03, ESP-07, ESP12, etc) it is attached to a programmable flash, ranging from 512K to 4 M. This increases the available user code space, and makes possible other cool features like a small file system, or OTA updates.

Install On Arduino IDE
This device can be directly programmed from the Arduino IDE. These steps can be followed if these boards were not programmed with the Arduino IDE. The only requirement is to install the board via the Arduino Boards Manager.
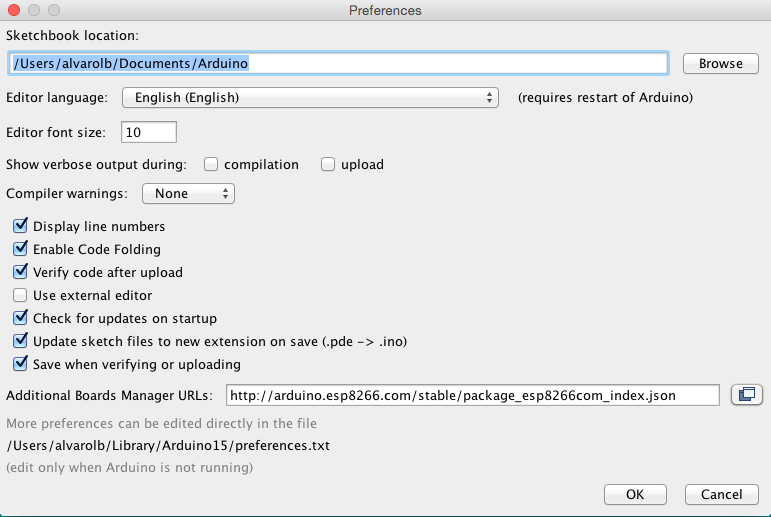
In the Arduino preferences, enter http://arduino.esp8266.com/stable/package_esp8266com_index.json in Additional Boards Manager URLs

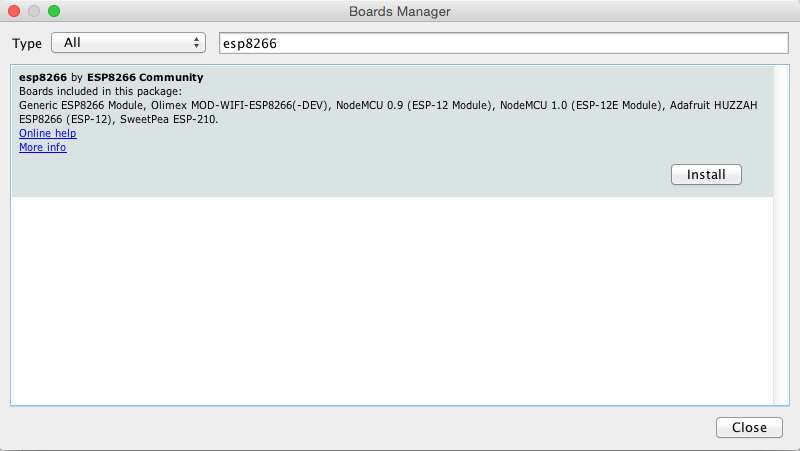
Next, go to the Boards manager to install the ESP8266 package. Tools > Boards > Board manager... Then search and install the esp8266 package.

Almost any ESP8266 can now be programmed directly from the Arduino IDE. From the Tools > Boards menu, the newly installed ESP8266 boards should be visible. The relevant board should be selected to compile code for the ESP8266.
Additional information for the ESP8266 package can be found in the ESP8266 GitHub Repository. The NodeMCU is the easiest board to program, as it does not require pressing the Flash + Reset buttons for uploading the sketch. For other boards, a USB to Serial converter (3v3!) will be needed, and the sketch will need to be flashed by setting some GPIOs to GND. It is advisable to search online for this step if unfamiliar with the process for a particular board.
ESP8266 WiFi
This example will allow connecting an ESP8266 device to the cloud platform in a few lines using the WiFi interface. The arduino_secrets.h file just needs to be modified with the relevant information.
ESP8266 WiFi WebConfig
It is possible to configure all parameters required for connection via a web Interface (captive portal). The device will create an access point where the user can connect to establish required information, like username, device identifier, credentials, and access point to connect.
Once this sketch is loaded on the device, it is possible to follow the next steps to connect it to the platform:
Connect to Thinger-Device WiFi with a computer or phone, using
thinger.ioas the WiFi passwordWait for the configuration window, or navigate to http://192.168.4.1 if it does not appear
Configure the wifi where the ESP8266 will be connected, and input the Thinger.io device credentials.
The device should now be connected to the platform.
Connect to the "Thinger-Device" WiFi with a computer or phone, using "thinger.io" as the WiFi password.
Configure the WiFi network to which the ESP32 will connect, and input the Thinger.io device credentials.
The device should now be connected to the platform.
The WebConfig interface includes different methods to control the captive portal:
clean_credentials: It cleans all credentials from the device (WiFi/user parameters). This way, the next time the device is booted will create the captive portal again to request the WiFi configuration. It can be executed after a long press on a button.
set_user: Initializes the default user for connecting the device to the platform (if set, this parameter is not requested from the user in the captive portal).
set_device: Initializes the default device for connecting the device to the platform (if set, this parameter is not requested from the user in the captive portal).
set_password: Initializes the default device password for connecting the device to the platform (if set, this parameter is not requested from the user in the captive portal).
add_setup_parameter: Add additional parameters to be requested in the captive portal, for example, any other configuration required for the execution: sampling intervals, meta-data, thresholds, etc.
set_on_config_callback: Set a callback to receive configuration provided by the user in the captive portal, i.e., user, device, password, or any additional parameter configured.
set_on_wifi_config: Set a callback to receive the result of the WiFi configuration. If the connection did not succeed, it can be used to clean credentials, so, the captive portal runs again.
set_on_captive_portal_run: Set a callback to receive the WiFiManager instance before the captive portal is shown. It can be used to add any other customization over the WebConfig interface.
ESP8266 WiFi SmartConfig
The SmartConfig (or recently named ESP-Touch) is a provisioning technology developed by TI to connect a new Wi-Fi device to a Wi-Fi network. It uses a mobile app to broadcast the network credentials from a smartphone or a tablet to an un-provisioned Wi-Fi device.
The advantage of this technology is that the device does not need to directly know the SSID or password of an Access Point (AP). This information is provided using a smartphone. This is particularly important for headless devices and systems, due to their lack of a user interface.
To use this Wi-Fi provisioning technology, this example is valid:
Once this sketch is loaded on the device, it is possible to set up WiFi credentials using example applications from Espressif. Just download and install the ESP Touch application from Espressif for a mobile phone and follow the onscreen instructions. Reference applications can be downloaded from here: https://www.espressif.com/en/products/software/esp-touch/resources
Last updated