

This guide connects a Linux computer, such as a Raspberry Pi, a gateway or a server, with the open source Thinger.io IOTMP client for Linux. You build the client, connect it with the device credentials and keep it running as a service. Once connected, you can open a shell and browse its files from the console.
Remote maintenance of a Linux fleet
To maintain Linux machines remotely, such as gateways, edge computers or industrial PCs, use ThinRemote instead of building this client. It installs with one command and adds remote SSH, file system access, remote desktop, access to local web services, monitoring and fleet management, also for AI agents. See the ThinRemote documentation.
Before you start
- A Thinger.io account. Your server is
YOUR_SERVER:iot.thinger.ioon the free Cloud account, or your own domain on a private instance. - A Linux computer on x86_64 or ARM (32 or 64 bits) with internet access and
sudo. - A C++20 compiler (GCC 11 or later, or Clang 14 or later), CMake, OpenSSL and Boost 1.86 or later, including Boost.Process. Older Boost releases, such as the one in Ubuntu 24.04, do not build the client.
Steps
Create the device
Console
Go to Devices and click Add Device. Choose IOTMP Device (Thinger.io protocol) as Device Type, set the Device Id to
YOUR_DEVICE, click Random in Device Credentials and copy the credentials. Click Add Device.API
bashcurl -X POST "https://YOUR_SERVER/v1/users/YOUR_USER/devices" \ -H "Authorization: Bearer YOUR_TOKEN" \ -H "Content-Type: application/json" \ -d '{"device": "YOUR_DEVICE", "type": "Generic", "credentials": "a-long-random-secret"}'CLI
bashthinger device create YOUR_DEVICE -t GenericAI
Ask your AI agentCreate an IOTMP device called YOUR_DEVICE in my Thinger.io account and show me its credentials.
Install the build tools
On Ubuntu 25.10:
bashsudo apt update sudo apt install build-essential cmake git libssl-dev libboost-all-dev libboost-process1.88-devUbuntu packages Boost.Process on its own: without
libboost-process1.88-dev, CMake stops withCould not find a package configuration file provided by "boost_process". On other Debian-based systems, install the Boost.Process package that matches their Boost version.Build the client
bashgit clone https://github.com/thinger-io/IOTMP-Linux.git cd IOTMP-Linux cmake -B build cmake --build build -j4 sudo install -m 755 build/thinger_iotmp /usr/local/bin/thinger_iotmpThe build downloads the libraries it needs and takes a few minutes on a Raspberry Pi.
Connect
Run the client with your username, the device ID and the device credentials.
-his the server; leave it out only if your server isiot.thinger.io.bashthinger_iotmp -u YOUR_USER -d YOUR_DEVICE -p 'YOUR_TOKEN' -h YOUR_SERVERHere
YOUR_TOKENis the device credentials. The client connects with TLS on port25206and reconnects by itself if the connection drops. Stop it withCtrl+C.Run it as a service
Keep the client running across reboots with systemd. Store the credentials in an environment file that only root can read:
/etc/thinger/iotmp.enviniTHINGER_USERNAME=YOUR_USER THINGER_DEVICE=YOUR_DEVICE THINGER_PASSWORD=YOUR_TOKEN THINGER_HOST=YOUR_SERVER/etc/systemd/system/thinger_iotmp.serviceini[Unit] Description=Thinger.io IOTMP client After=network-online.target Wants=network-online.target [Service] EnvironmentFile=/etc/thinger/iotmp.env WorkingDirectory=/home/pi ExecStart=/usr/local/bin/thinger_iotmp Restart=on-failure RestartSec=5 [Install] WantedBy=multi-user.targetThe service runs as root, so the remote Terminal opens a root shell. Add
User=with another account to limit what the console can do.WorkingDirectoryis the folder that Explorer shows; change/home/pito the folder you want to share.bashsudo chmod 600 /etc/thinger/iotmp.env sudo systemctl daemon-reload sudo systemctl enable --now thinger_iotmp systemctl status thinger_iotmp journalctl -u thinger_iotmp -f
Result
The device shows as connected in Devices. Its device resources answer from the console, the API and the CLI:
thinger device resource call YOUR_DEVICE version{
"major": 1,
"minor": 3,
"patch": 0,
"version": "1.3.0"
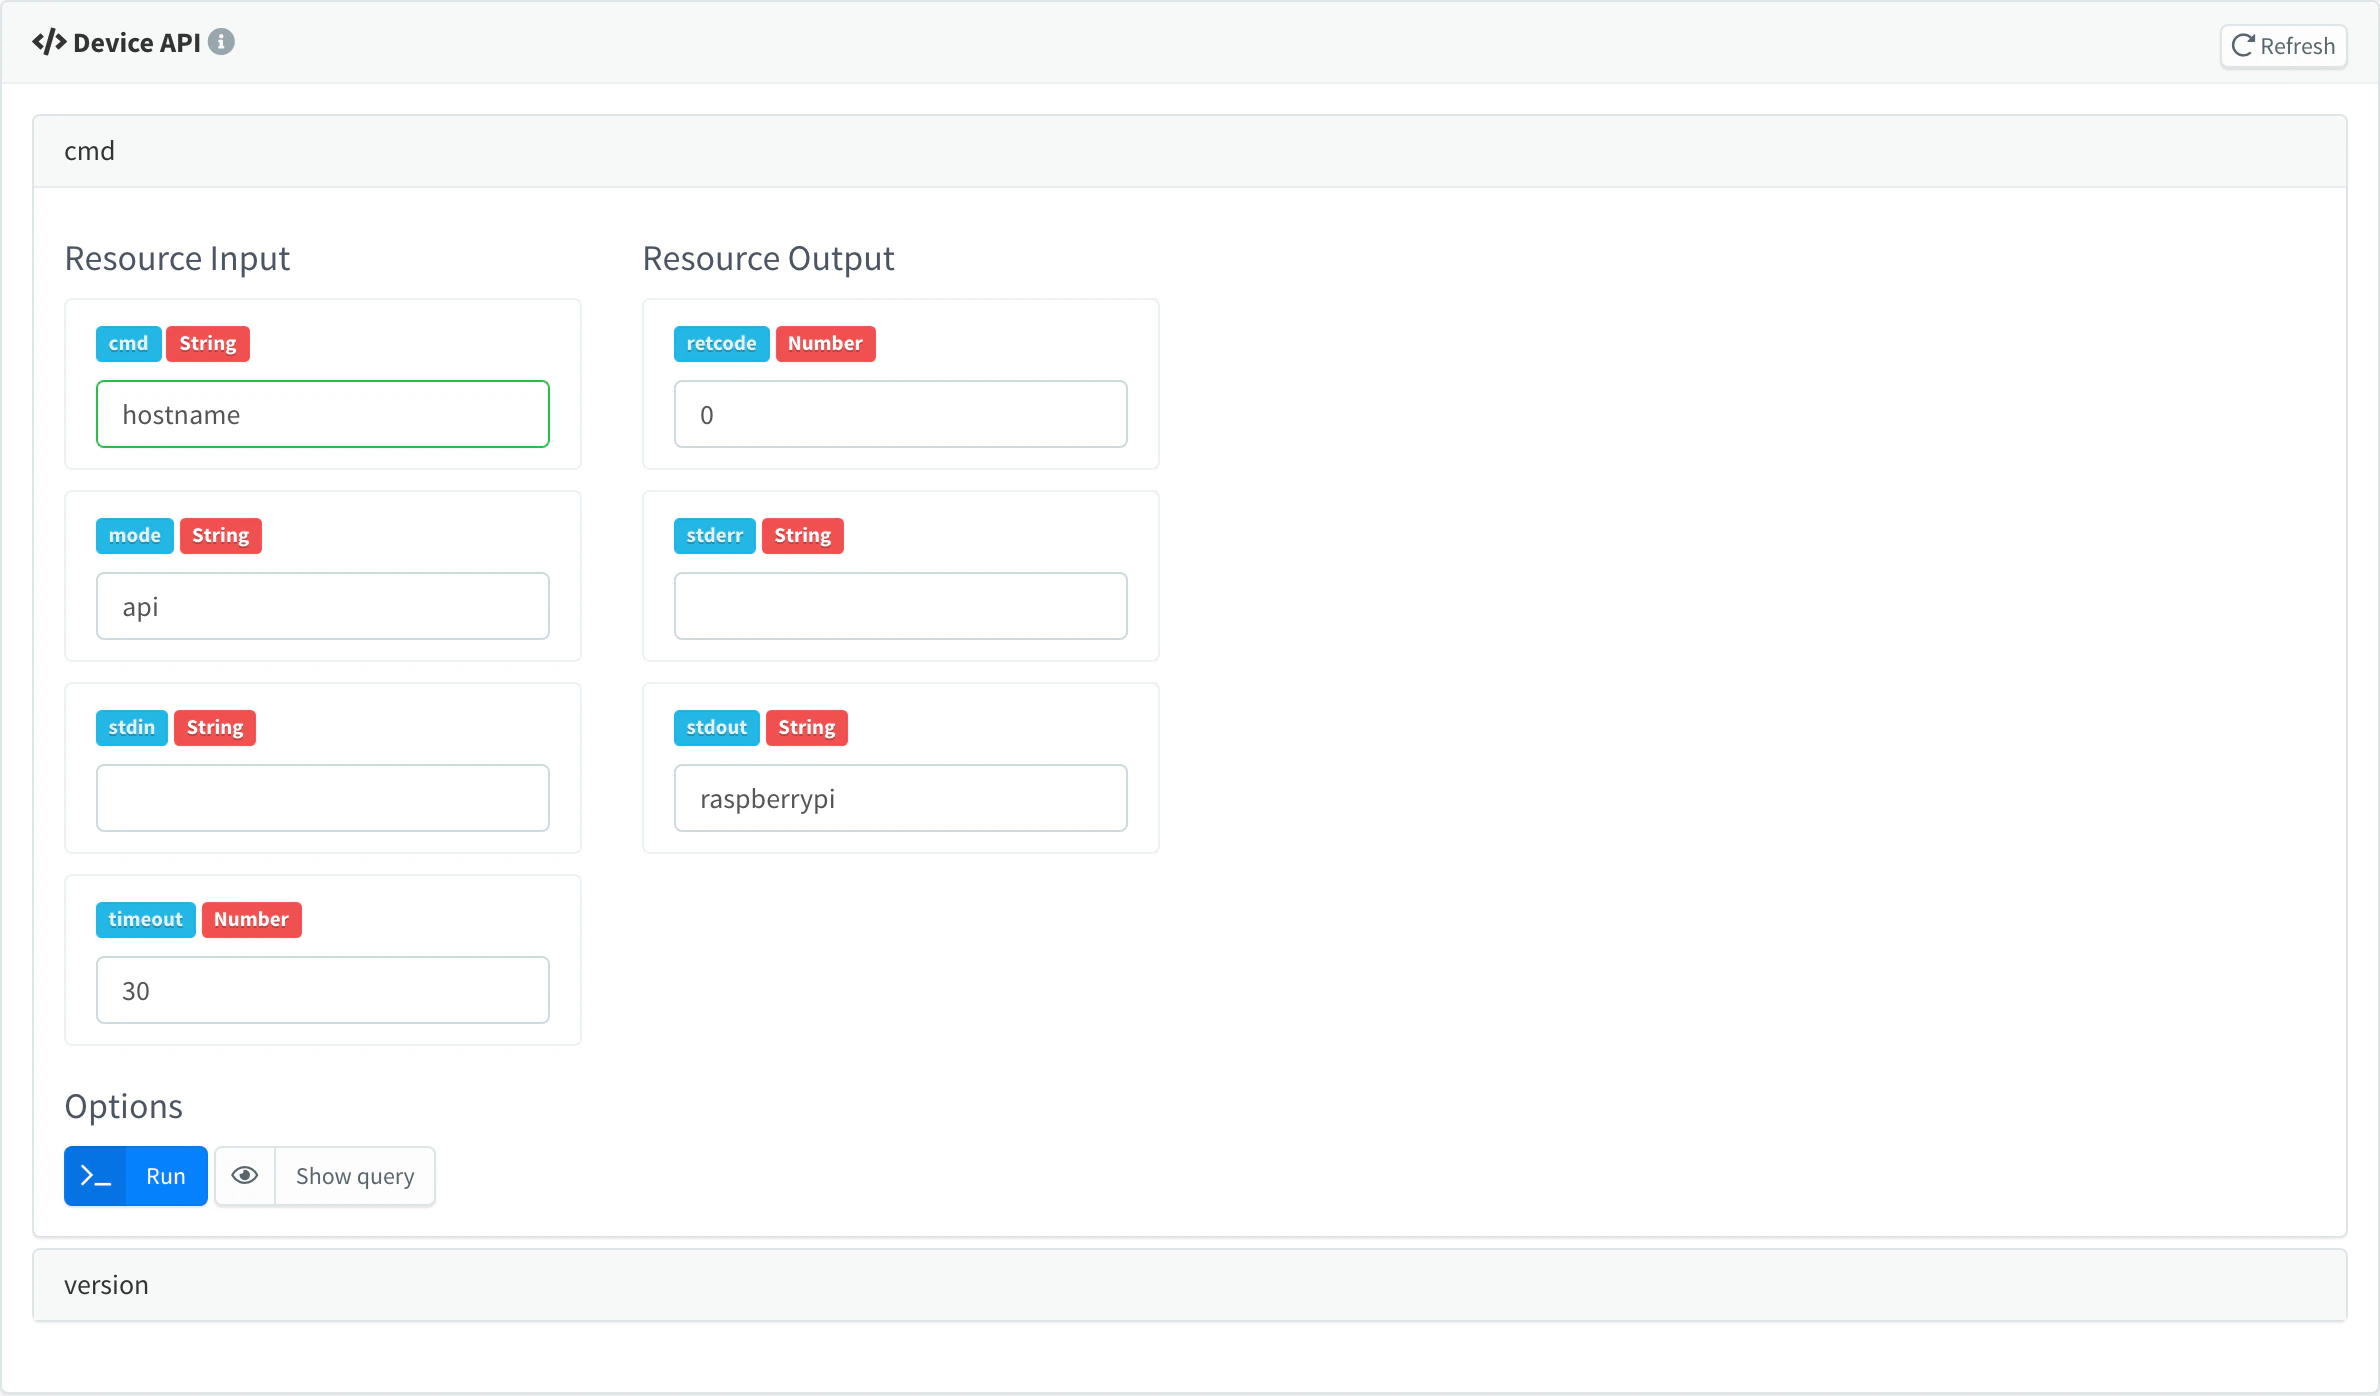
}In the console, the API tab of the device lists cmd and version. Fill in the cmd input and click Run to see the output of a command:
Open the device and use Terminal for a shell and Explorer for its files: see Remote tools.
Client options
| Option | Environment variable | Default | Meaning |
|---|---|---|---|
-u, --username | THINGER_USERNAME | Your Thinger.io username. | |
-d, --device | THINGER_DEVICE | Device ID. | |
-p, --password | THINGER_PASSWORD | Device credentials. | |
-h, --host | THINGER_HOST | iot.thinger.io | Server host. |
-t, --transport | THINGER_TRANSPORT | ssl | ssl (TLS, port 25206), ws (WebSocket over HTTPS, port 443, for networks that only allow web traffic) or tcp (no encryption, port 25204). |
-f, --fs-path | current folder | Folder that Explorer can read and write. Nothing outside it is reachable. | |
-v, --verbosity | THINGER_VERBOSITY | 0 | 0 warnings, 1 information, 2 debug. |
Warning
With -v 1 or higher, the log shows the connection messages, including the device credentials. Use it only to diagnose a problem, and do not share the log as is.
What the client provides
| Device resource or tool | What it does |
|---|---|
| Terminal | An interactive shell on the computer, from the console. |
| Explorer | Lists, uploads, downloads, moves and deletes files inside the --fs-path folder. |
cmd | Runs a shell command and returns retcode, stdout and stderr. |
version | Reports the client version. |
Try cmd from the API:
curl -X POST "https://YOUR_SERVER/v3/users/YOUR_USER/devices/YOUR_DEVICE/resources/cmd" \
  -H "Authorization: Bearer YOUR_TOKEN" \
  -H "Content-Type: application/json" \
-d '{"cmd": "uname -m"}'{"retcode": 0, "stderr": "", "stdout": "aarch64\n"}Anyone with access to the device resources of this device can run commands on the computer. Give access tokens and agents only the permissions they need: see Access Tokens.
Write your own program
The client is also a C++20 library. Add it to a CMake project and declare your own device resources, write to Data Buckets, read properties and use MQTT topics from your code. The library, its API and examples are in the IOTMP-Linux repository. For the protocol, see the IOTMP reference.
Test without hardware
You do not need a Raspberry Pi to try Thinger.io:
- Run the client on any Linux computer, a virtual machine or a container. It behaves like any other device.
- Create a virtual device, whose device resources are computed on the platform.
Troubleshooting
| Symptom | Cause | Fix |
|---|---|---|
Error: unrecognised option | An environment variable that starts with THINGER_ is not one of the options above. | Remove or rename that variable. |
username, device, or credentials not provided | An option or environment variable is missing. | Pass -u, -d and -p, or set the three variables. |
| The client keeps reconnecting and the device stays disconnected | Wrong credentials, wrong server, or the device does not exist. | Check the three values and -h. Run once with -v 1 to see the authentication result. |
| Cannot connect on a corporate network | Port 25206 is blocked. | Use -t ws, which goes through port 443. |
| Explorer shows an unexpected folder | The client serves the folder it was started in. | Set --fs-path or WorkingDirectory. |
More cases in Troubleshooting.